Solar Charger Shield V2.2

The solar charger is a stackable shield to Arduino compatible platforms, enables adaptive battery power and act as energy harvester for in-field charging. You may use various batteries that has the voltage of 3.0V-4.2V to shift up for 5V output, or put on Li-ion battery and solar panel to form an autonomous sensor unit. The maximum current provided by the board can get up to 600mA. An usb connector is also useful to charge the battery.

Features
Short circuit protection
3W Output Power when connecting battery
Continuous Charge Current Up to 900mA
Battery status indication ( Red : Charging , Green: Charged )
Micro-USB Connector
Specification
Battery input voltage: 3.0~4.5V
USB input voltage: 4.75~5.25V
Solar input voltage: 4.8~6V
Maximum Output Power(with battery): 3W(600mA@5V)
Ripple voltage:<100mV @ 500mA
Dimensions: 68*53mm
Applications
- Wireless sensor unit
- Solar charge
- Tweet-a-volt-arduino
Information on use of Solar panels for charging
1) The solar charger shield produces charges under sunlight and light from filament bulbs. Its function is more effective in the former than in the latter. Solar panels require invisible radiations namely ultraviolet and infrared radiations for producing current.
2) In order to test the system under filament bulb, hold the solar panel at a distance, less than 20cm(< 0.5 feet). However, the charging may not be effective under filament bulbs.
3) Place the solar panel at an angle such that the maximum amount of sunlight is incident on it.
4) Protect the solar panel from excessive exposure to water/water vapors. This may oxidize the surface of the solar panel and reduce its performance.
5) The Solar panel usually comes with a protective transparent sheet of cover. Remove the transparent plastic sheet for better performance of the solar panel.
6) Protect the surface of the solar panel from scratches
Caution
1) The solar charger shield is designed to protect any potential short circuit. However care must be taken to avoid any such situations.
2) The solar shield should not be operated at voltages greater than 5V
Usage
1) Connect the Solar panel and the Li-Pol battery in their designated places as shown in the figure below:
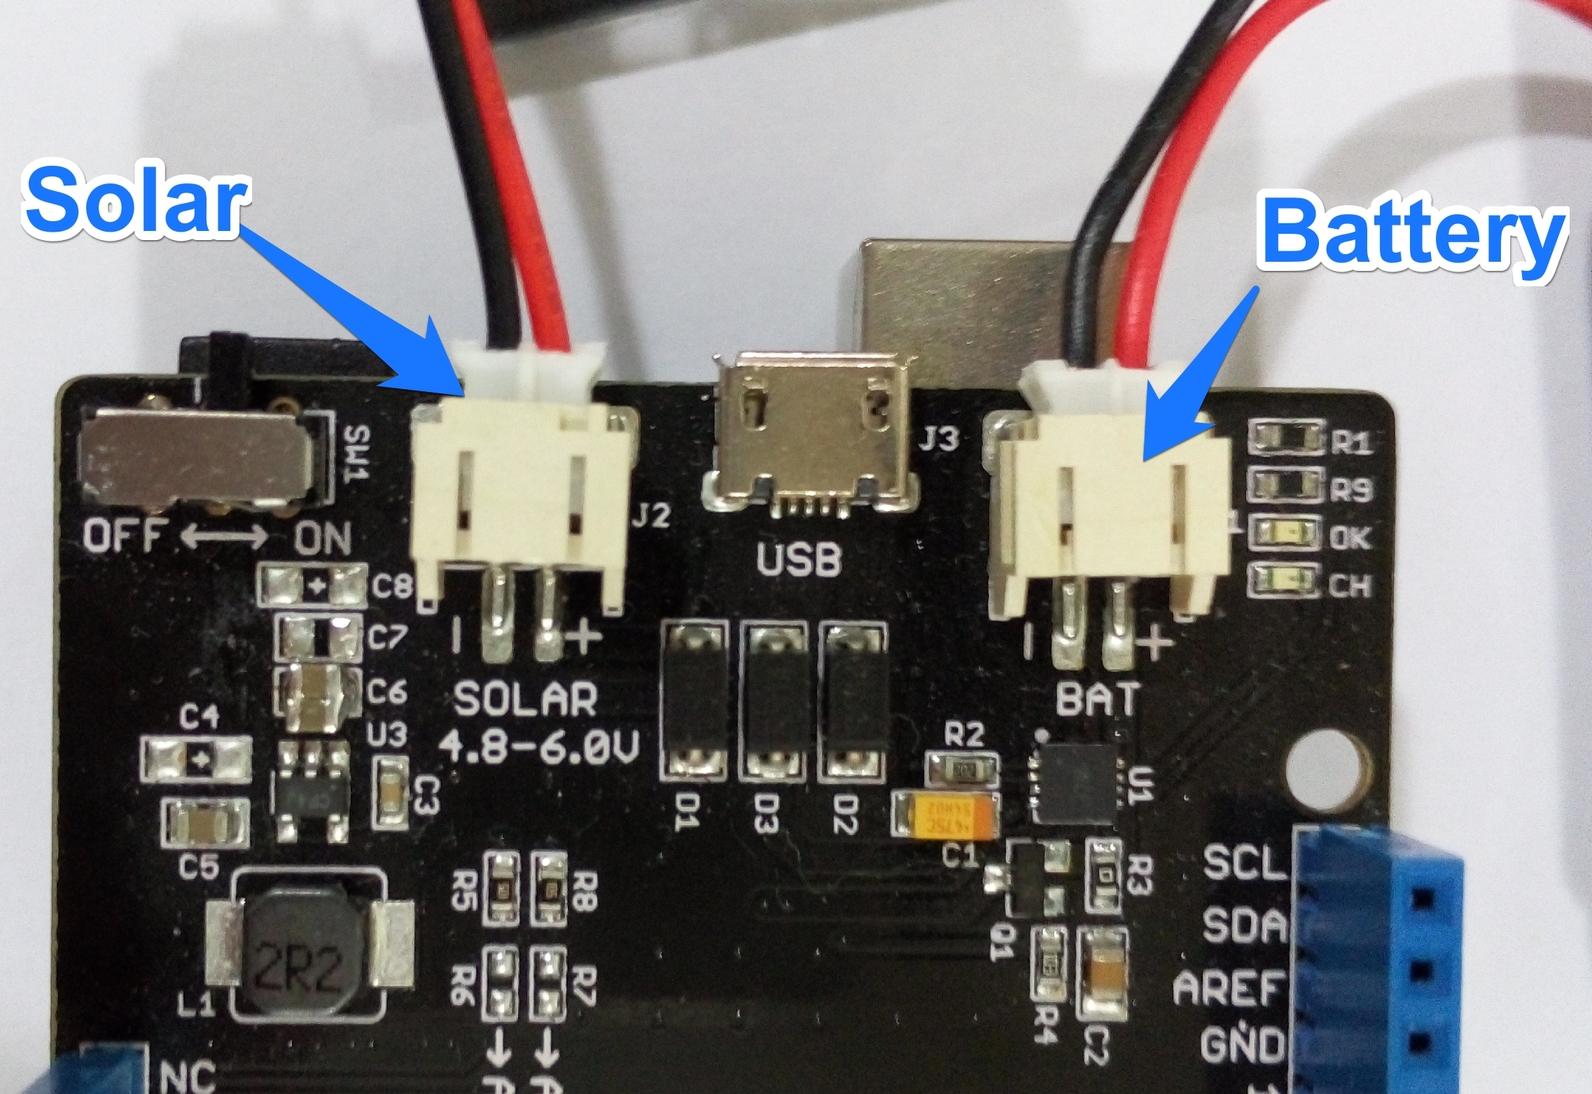
Solar_Charger_Shield_v2.2_inputs.jpg
2) Place the solar under sunlight or filament bulbs as mentioned in the "Information for using solar panels" section
3) Ensure that the charging (Red) light glows as shown in the figure below:

4) When the battery is fully charged, the green light glows.
5) Then you can mount the shield on to the arduino. As you power up the solar charger shield, it should power up the arduino as shown in the figure below:

Testing the solar shield with a simple arduino program
This section will teach you how to measure the voltage of Lipo Battery.
In order to connect the VBAT pin to Analog pin A0, so that we can read the data from A0 pin, we need to Short R7 using a 0ohm resistor as shown in the figure

Programming Example
You can measure the voltage of Battery using the following example:
/*
 Solar charger shield voltage measurement example. Connect VBAT pin to analog pin A0.

 The pin measures 2.0 V when not under direct exposre to sunlight and 5V when exposed to sunlight.

 This example code is in the public domain.

 */

// These constants won't change.  They're used to give names
// to the pins used:
const int analogInPin = A0;  // Analog input pin that the VBAT pin is attached to


int BatteryValue = 0;        // value read from the VBAT pin
float outputValue = 0;        // variable for voltage calculation

void setup() {
    // initialize serial communications at 9600 bps:
    Serial.begin(9600);
}

void loop() {
    // read the analog in value:
    BatteryValue = analogRead(analogInPin);
    // Calculate the battery voltage value
    outputValue = (float(BatteryValue)*5)/1023*2;
    // print the results to the serial monitor:
    Serial.print("Analog value = " );
    Serial.print(BatteryValue);
    Serial.print("\t voltage = ");
    Serial.println(outputValue);
    Serial.println("V \n");

    // wait 10 milliseconds before the next loop
    // for the analog-to-digital converter to settle
    // after the last reading:
    delay(10);
}
Schematic Online Viewer
Resources
Tech Support & Product Discussion
Thank you for choosing our products! We are here to provide you with different support to ensure that your experience with our products is as smooth as possible. We offer several communication channels to cater to different preferences and needs.